Content Creator Workflow: From Idea to Viral Video in 5 Steps
The complete 5-step workflow for creating viral short-form videos consistently. From ideation to publishing with AI-powered optimization at every stage.

The repeatable system top creators use to produce high-performing videos consistently
The difference between a creator who posts randomly and one who grows steadily isn't talent. It's workflow. The creators who consistently hit 100K+ views have a system they follow for every single video. They don't rely on inspiration. They rely on process. This guide breaks down the exact 5-step workflow and shows you how to integrate AI tools like the Viral Finder suite into each step for maximum impact.
<video src="https://s3.us-east-1.amazonaws.com/remotionlambda-useast1-k5qomcb1pb/renders/nf7mqnc4t9/out.mp4" controls playsinline style="width:100%;border-radius:12px;margin:24px 0;"></video>
Table of Contents
- Why You Need a Repeatable Workflow
- Step 1: Ideation — Finding Topics That Work
- Step 2: Scripting — Building the Structure
- Step 3: Filming — Execution That Matches the Plan
- Step 4: Editing — Optimizing for Retention
- Step 5: Publishing — SEO, Timing, and Distribution
- Batch Production: How to Create a Week of Content in One Day
- The Post-Publish Review Loop
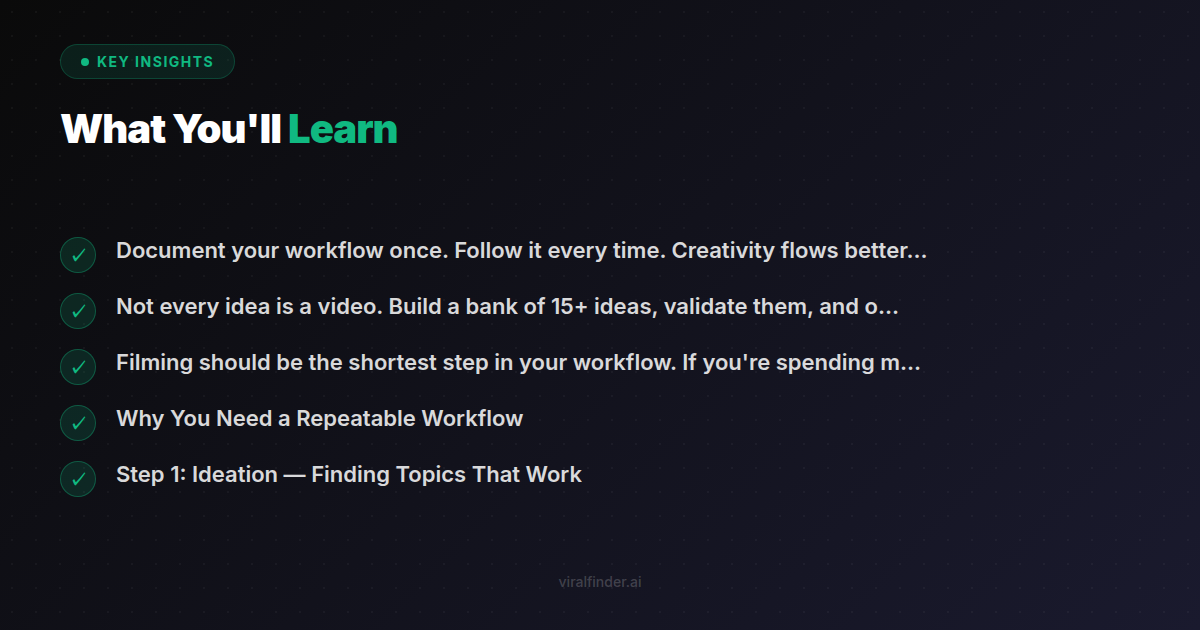
Why You Need a Repeatable Workflow
Inconsistency is the #1 killer of creator growth. Not bad content. Not the algorithm. Inconsistency. When you don't have a workflow, every video feels like starting from scratch. You waste energy on decisions that should be automatic.
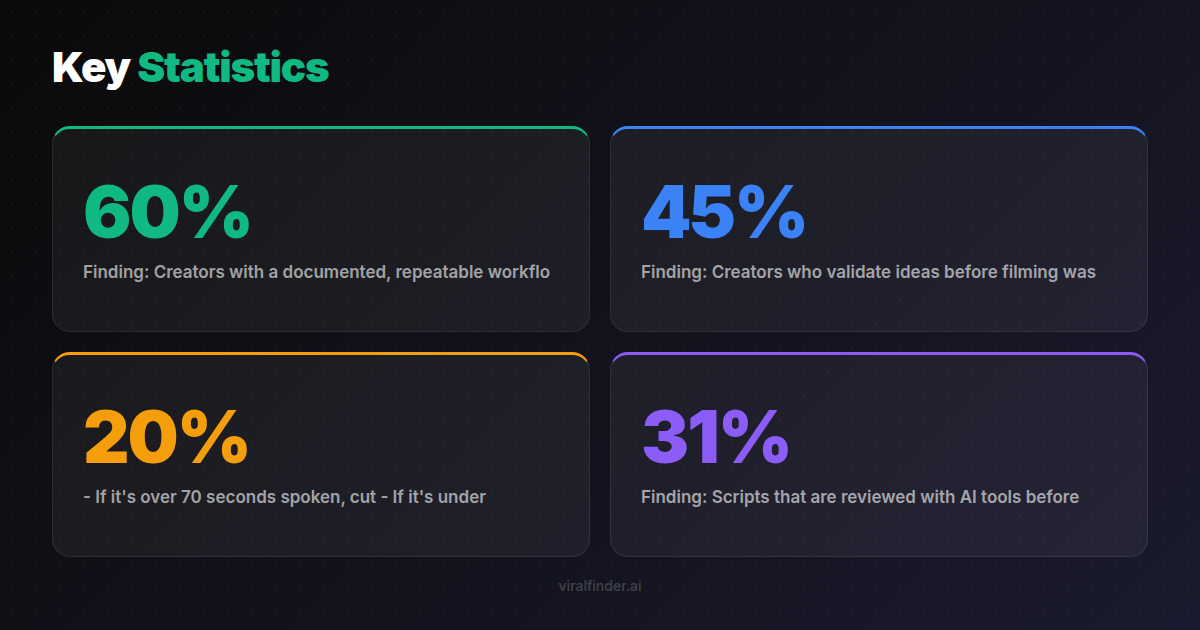
Finding: Creators with a documented, repeatable workflow produce 3.4x more content per week and report 60% less creative burnout than those without one.
A workflow doesn't constrain creativity. It channels it. Instead of spending mental energy on "where do I start?" you spend it on "how do I make this video great?"
The 5-step workflow below takes a video from raw idea to published post in under 2 hours. Once you've done it 10 times, it becomes second nature.
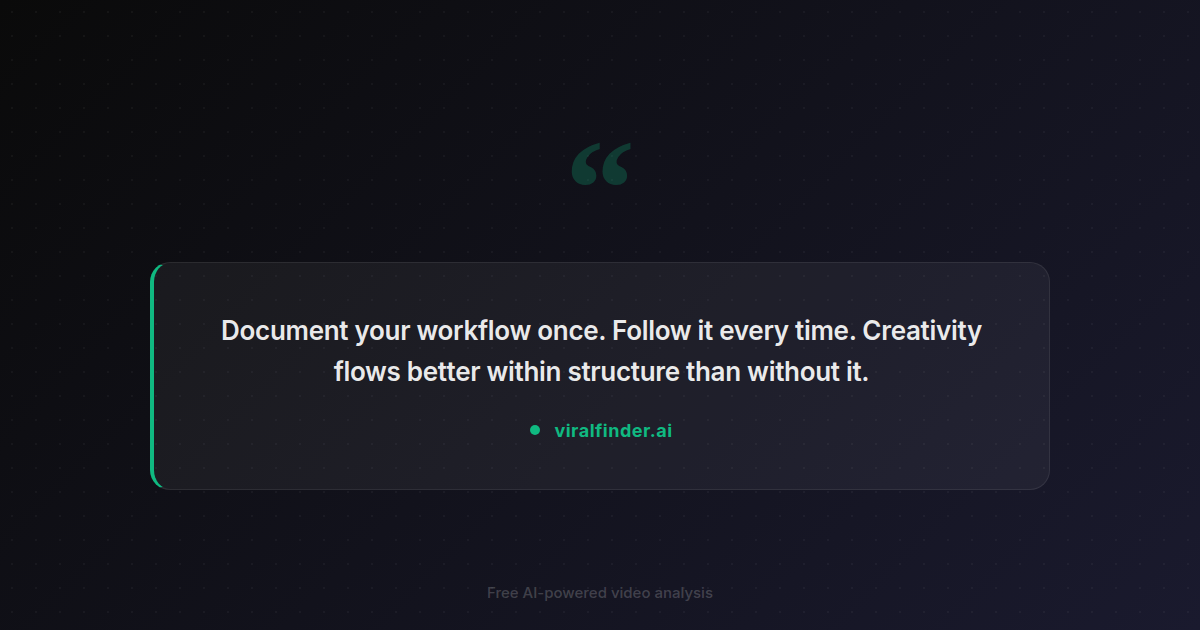
Takeaway: Document your workflow once. Follow it every time. Creativity flows better within structure than without it.
Step 1: Ideation — Finding Topics That Work
Don't wait for inspiration. Build a system for generating ideas:
The Content Bank Method
Spend 30 minutes every Monday filling a simple spreadsheet with 10-15 video ideas. Sources:
- Your comments section. Questions from viewers are guaranteed-interest topics.
- Competitor top videos. What performed best for creators in your niche this week? (Use the Video Analyzer to score their top videos and understand why they worked.)
- TikTok search autocomplete. Type your niche keyword and note what people are searching for.
- Your own analytics. Which of your past videos got the most saves and shares? Make more like those.
- Trending sounds and formats. Can you adapt a trending format to your niche?
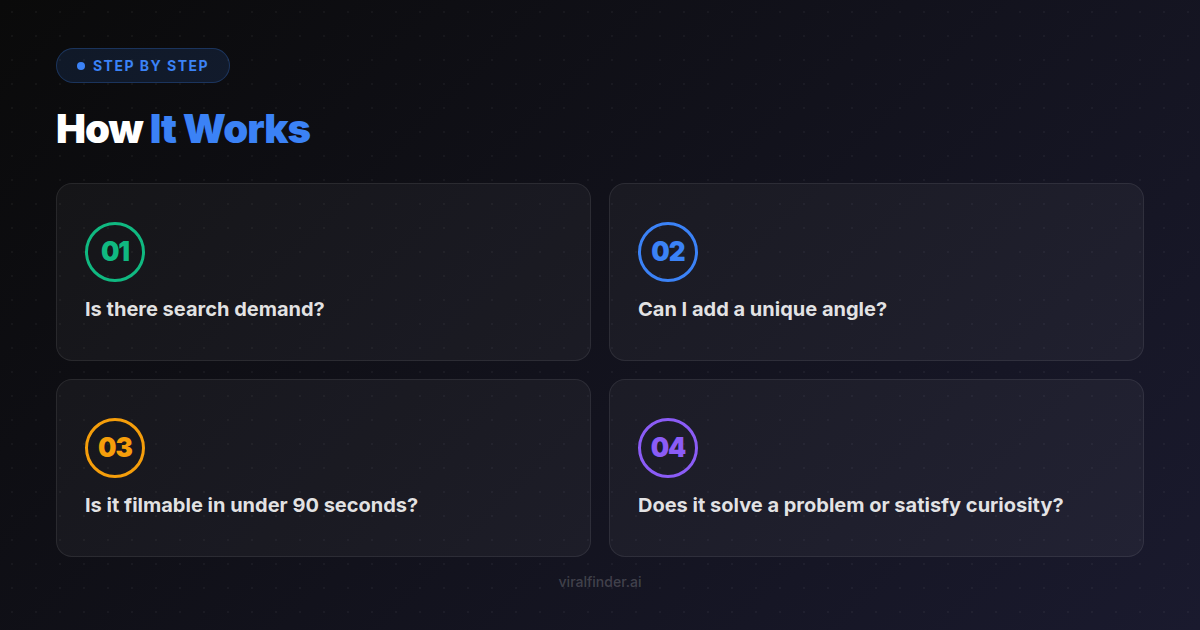
Idea Validation
Not every idea deserves a video. Before committing, check:
- Is there search demand? (Does it appear in autocomplete?)
- Can I add a unique angle? (What do I know that others don't?)
- Is it filmable in under 90 seconds? (Can the idea be compressed?)
- Does it solve a problem or satisfy curiosity? (Will someone share it?)
Finding: Creators who validate ideas before filming waste 45% less time on underperforming content compared to those who film every idea they have.
Takeaway: Not every idea is a video. Build a bank of 15+ ideas, validate them, and only film the strongest 5-7 each week.
Step 2: Scripting — Building the Structure
Once you've chosen your topic, write the script. Even a 30-second video benefits from a written structure.
The Script Blueprint
Every short-form script follows this pattern:
HOOK (0-3 seconds): Stop the scroll
CONTEXT (3-8 seconds): Why should they care?
BODY (8-45 seconds): Deliver the value (escalate tension)
PAYOFF (45-55 seconds): The big reveal or conclusion
CTA (55-60 seconds): Tell them what to do next
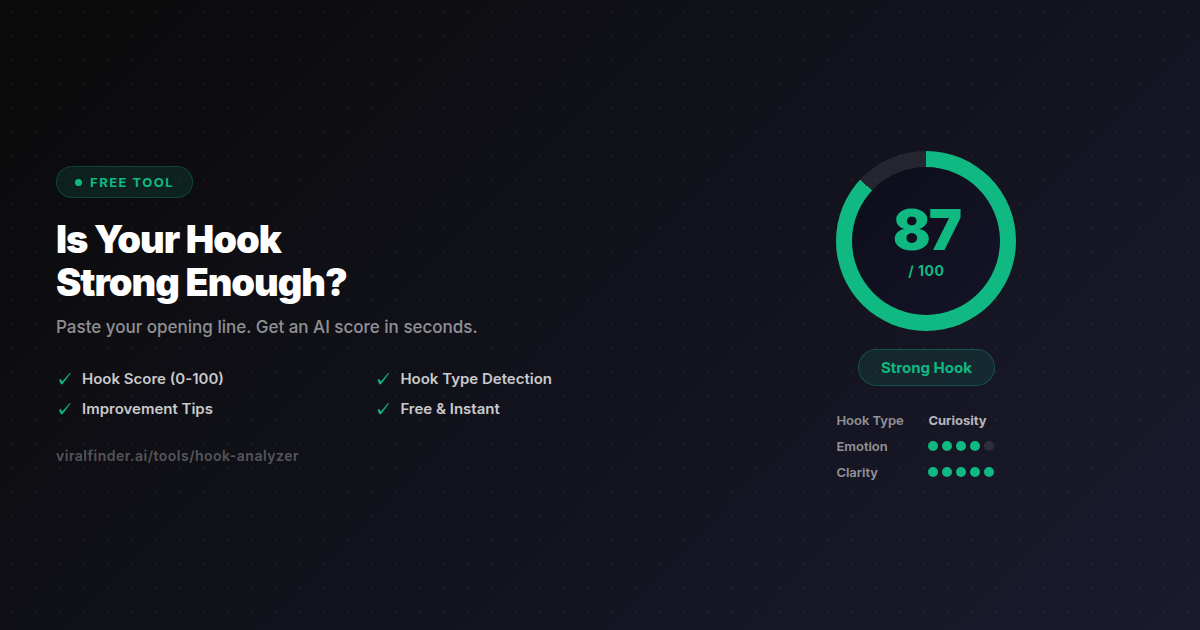
Writing the Hook
Write 3-5 hook variations. Paste each one into the Hook Analyzer and pick the highest-scoring one. Aim for 8/10 or higher.
Good hooks include:
- A specific number or statistic
- A contrarian claim
- A direct address to the target viewer
- An open loop that demands resolution
Reviewing the Full Script
After writing the complete script, paste it into the Script Reviewer. You'll get separate scores for:
- Hook (0-10): Is the opening strong enough?
- Structure (0-10): Does the flow hold attention?
- CTA (0-10): Does the ending drive action?
Fix the lowest-scoring element first. Don't film until all three are 7+.
Timing Your Script
Read the script out loud and time it. For a 60-second video:
- If it's over 70 seconds spoken, cut 20%
- If it's under 40 seconds, add more value or detail
- Mark where pattern interrupts should go (every 5-7 seconds)
Finding: Scripts that are reviewed with AI tools before filming produce videos with 31% higher retention rates on average compared to unreviewed scripts.
Step 3: Filming — Execution That Matches the Plan
Filming is where most creators waste time. With a tight script, this step becomes fast and focused.
Pre-Filming Checklist
- Script reviewed and scored 7+ on all elements
- Lighting is consistent (natural light or ring light)
- Audio is clean (quiet room, mic close to mouth)
- Camera is at eye level (not looking down at phone)
- Text overlay for first frame is planned
- Background is clean and not distracting
Filming Techniques for Retention
- Film multiple takes of the hook. The first 3 seconds are worth re-shooting 5 times to get perfect.
- Change camera angles at the points you marked for pattern interrupts.
- Maintain high energy throughout (viewers detect low energy instantly).
- Don't read your script word-for-word. Use it as a guide, speak naturally.
- Film B-roll for 30 seconds (screen recordings, product shots, demonstrations). You'll use this in editing.
Batch Filming
Film 3-5 videos in one session. Change your shirt between takes if you don't want them all posted on the same day. This is vastly more efficient than setting up and tearing down for one video at a time.
Takeaway: Filming should be the shortest step in your workflow. If you're spending more time filming than scripting, your process is backwards.
Step 4: Editing — Optimizing for Retention
Editing is where good content becomes great content. Your goal is maximum information density with zero dead time.
The 5-Second Rule
Watch your edit and mark every 5-second segment. For each segment, ask: "Does this add value, entertainment, or tension?" If the answer is no, cut it.
Essential Editing Elements
- Captions - Add readable, well-timed captions to every video
- Text overlays - Key stats, quotes, or emphasis words as visual reinforcement
- B-roll cutaways - Break up talking-head footage every 5-7 seconds
- Sound effects - Subtle sound design for transitions and emphasis
- Music - Low background music that matches the energy of your content
The Final Check
After editing, run the finished video through the Video Analyzer. Check:
- Viral score: Aim for 70+
- Hook analysis: Does the first frame and opening pass?
- Retention map: Are there predicted drop-off points?
- SEO suggestions: Are title, tags, and descriptions optimized?
If the score is below 70, identify the weakest element from the analysis and fix it. A 10-minute re-edit is better than posting a video that will underperform.
Finding: The average creator spends 15 minutes editing a short-form video. Creators who consistently go viral spend 35-45 minutes, with the extra time spent on pattern interrupts, captions, and pacing optimization.
Step 5: Publishing — SEO, Timing, and Distribution
The last step is publishing with intentional optimization, not just hitting "post."
Caption and Hashtag Optimization
- Include your primary keyword in the first line of the caption
- Use 8-12 targeted hashtags (3 niche + 5 medium + 2 trending)
- End with a CTA that drives comments (questions work best)
- Write naturally — keyword stuffing is penalized
Optimal Posting Times
The best posting time depends on YOUR audience, not generic advice. Check your analytics:
- TikTok: Creator tools → Analytics → Follower activity
- Instagram: Professional dashboard → Your audience → Most active times
- YouTube: Studio → Analytics → Audience → When your viewers are on YouTube
If you're just starting out and have no data, these general windows work well:
- Weekdays: 11 AM - 1 PM, 7 PM - 9 PM (local time of your target audience)
- Weekends: 9 AM - 11 AM, 7 PM - 10 PM
Cross-Platform Distribution
Film once, optimize for each platform:
- TikTok: 9:16 ratio, up to 3 minutes, sound-on focus
- Instagram Reels: 9:16 ratio, up to 90 seconds, aesthetic matters more
- YouTube Shorts: 9:16 ratio, up to 60 seconds, title and thumbnail matter most
Remove platform watermarks before cross-posting. TikTok videos with the TikTok watermark perform 30% worse on Instagram and YouTube.
Takeaway: Publishing isn't the end of the process. It's a strategic step that requires keyword optimization, timing, and platform-specific adaptation.
Batch Production: How to Create a Week of Content in One Day
The most efficient creators don't create one video at a time. They batch:
Monday: Ideation + validation (1 hour → 7 ideas) Tuesday: Script all 7 videos + AI review (2 hours) Wednesday: Film all 7 videos (3 hours, batch shooting) Thursday: Edit all 7 videos + AI analysis (4 hours) Friday-Sunday: Publish 1-2 per day on schedule
Total production time: 10 hours for 7 videos = 1.4 hours per video.
Compare this to creating one video at a time: 2-3 hours each including setup, context switching, and workflow inefficiency = 14-21 hours for 7 videos.
Finding: Batch production reduces per-video production time by 55% while maintaining or improving quality, because creators stay in "flow state" for each production phase.
The Post-Publish Review Loop
Your workflow doesn't end at publishing. The review loop is what makes your system improve over time.
48-Hour Check
Two days after posting, check:
- View count and retention rate
- Which platform performed best?
- What was the viral score prediction? Did it match reality?
Weekly Review (15 minutes)
Every week, answer:
- Which video performed best? Why? (Analyze with the Video Analyzer)
- Which video performed worst? Why?
- What hook type scored highest this week?
- What topic got the most saves/shares?
- What will I do differently next week?
Monthly Trend Analysis
Every month:
- Identify your top 3 videos and extract the common elements
- Analyze 5 competitor videos that outperformed yours
- Adjust your content bank to lean into what's working
- Update your script templates based on learnings
Finding: Creators who conduct weekly performance reviews grow 2.1x faster than those who never review, because they compound small improvements over time.
Takeaway: The workflow is a loop, not a line. Publish → review → learn → improve → publish again. Each cycle makes your content slightly better.
Consistency beats creativity. Workflow beats talent. The 5-step system in this guide is the same process used by creators who post daily without burning out and grow steadily without relying on luck. Start today. Script your next video, test your hook with the Hook Analyzer, and analyze the result with the Video Analyzer. Your future self will thank you.
Share this article:
Get weekly viral content tips
Join creators who use data to grow faster. Free tips, strategies, and insights in your inbox.
No spam. Unsubscribe anytime.
How viral is your video?
Paste a TikTok, YouTube, or Instagram link and get an AI viral score 0-100 — with detailed feedback on hook, pacing, and engagement. Free, no signup.
Analyze my video →Try our other free tools